What causes hoodie print cracking: common reasons across print methods
Print cracking happens for many reasons, but a systematic checklist helps identify common causes before investing in a reprint. Understanding these factors allows both print shops and consumers to take corrective action early.
Poor ink quality and expired supplies
Low-cost or old inks don’t bond properly because they lose stretchiness and adhesion over time. Brands like STS Inks and Kodak offer durable DTF inks specifically formulated to resist cracking and maintain flexibility through repeated wash cycles.
Expired inks clog print heads, separate into inconsistent layers, or fail to cure properly even when settings are correct. These weakened layers peel or flake after just a few washes, leading to customer complaints and brand damage.
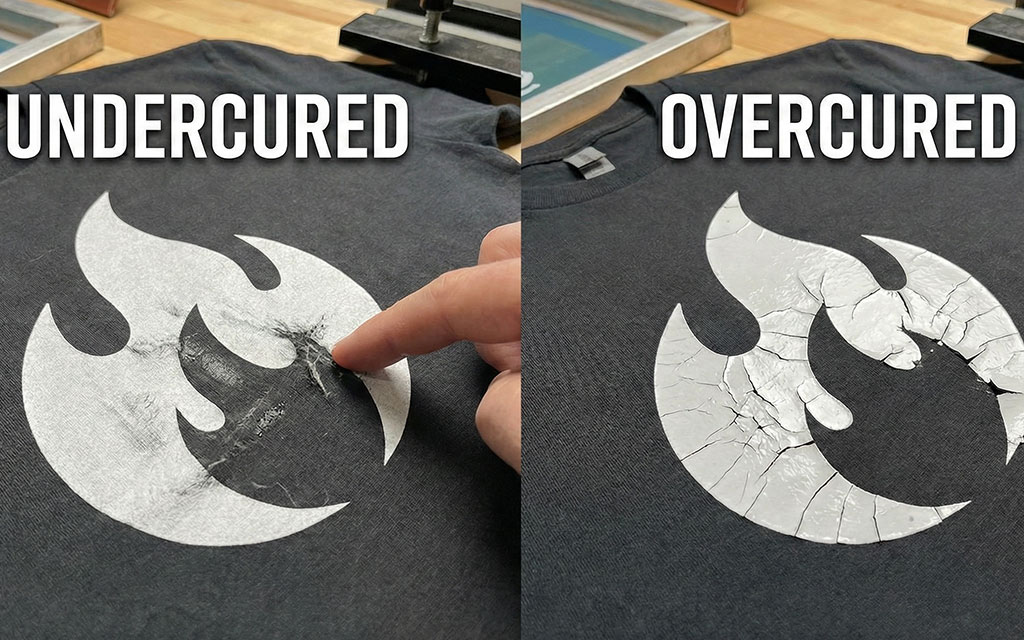
Improper curing and overcure vs undercure effects
Curing makes ink adhere permanently to fabric or film. If the cure is insufficient, the ink stays tacky and weak, failing after the first few wash cycles. Most DTF prints cure at 110–120°C for 2–3 minutes, but numbers vary by manufacturer, so always check technical data sheets and test samples first.
Overcuring makes prints brittle and rigid, causing cracks when garments flex during wear. The window between undercure and overcure can be narrow with some ink systems, making precise temperature control essential.
Wrong heat press settings: temperature, time, and pressure
The heat press is the final bonding step, and incorrect settings ruin otherwise perfect prints. Temperature that’s too low, short press time, or light pressure causes edges to lift and centers to bond poorly.
Temperature that’s too high, long press time, or heavy pressure scorches the adhesive layer, making prints stiff and crack-prone. For DTF transfers, aim for 160–170°C (320–340°F) for 15–20 seconds with medium pressure, but always test on scrap fabric first.
Uneven or incorrect adhesive powder and transfer films (DTF-specific)
Adhesive powder must be applied evenly across the print area. Too little powder leads to weak spots that peel, while too much creates stiff areas that crack when fabric stretches.
Humidity causes powder to clump, creating “glue spots” that fail under stress. Automatic powder shakers help in production runs, while clean trays with manual shaking work for small batches. DTF failures often trace back to uneven powder, poor dtf films, or incorrect transfer films incompatible with specific ink systems.
Environmental factors and equipment maintenance
Uneven airflow in conveyor ovens creates hot spots and cold zones that result in variable cure across a single print. Press calibration should happen monthly to ensure temperature readings, dwell times, and pressure levels remain consistent.
Proper storage for adhesive powder in airtight containers prevents moisture absorption and clumping. Regular quality checks of ink batches catch problems before they cause undercured or overcured conditions that lead to cracking.
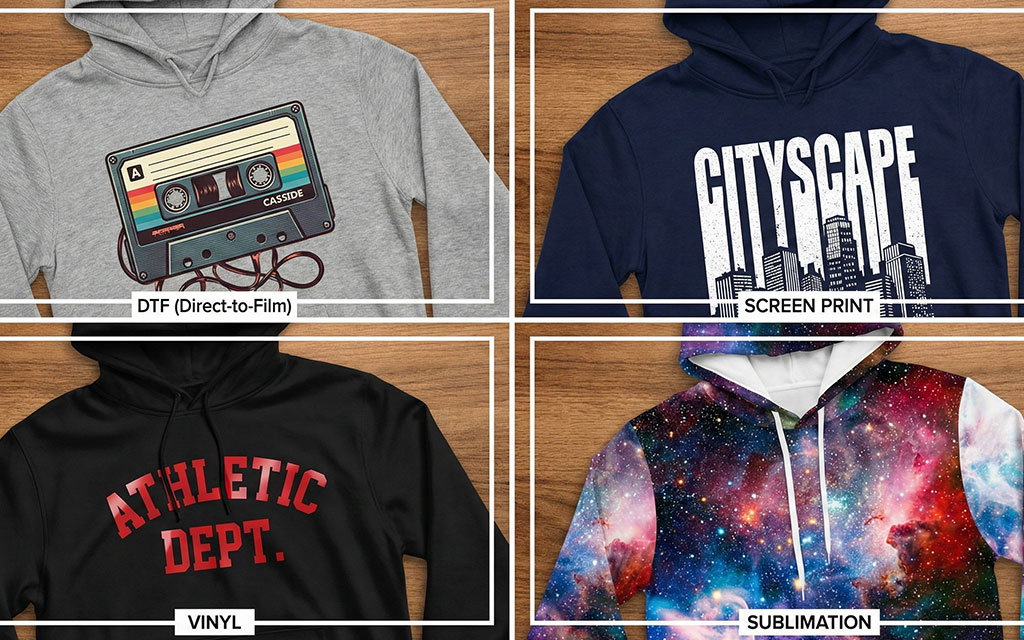
Comparing print types: how DTF, screen printing, plastisol, and heat transfers crack differently
Cracking issues vary by print type and fabric composition. Different techniques have specific weak points that appear during wear and washing, so selecting the best hoodie for screen printing or DTF application requires matching the method to intended use and care requirements.
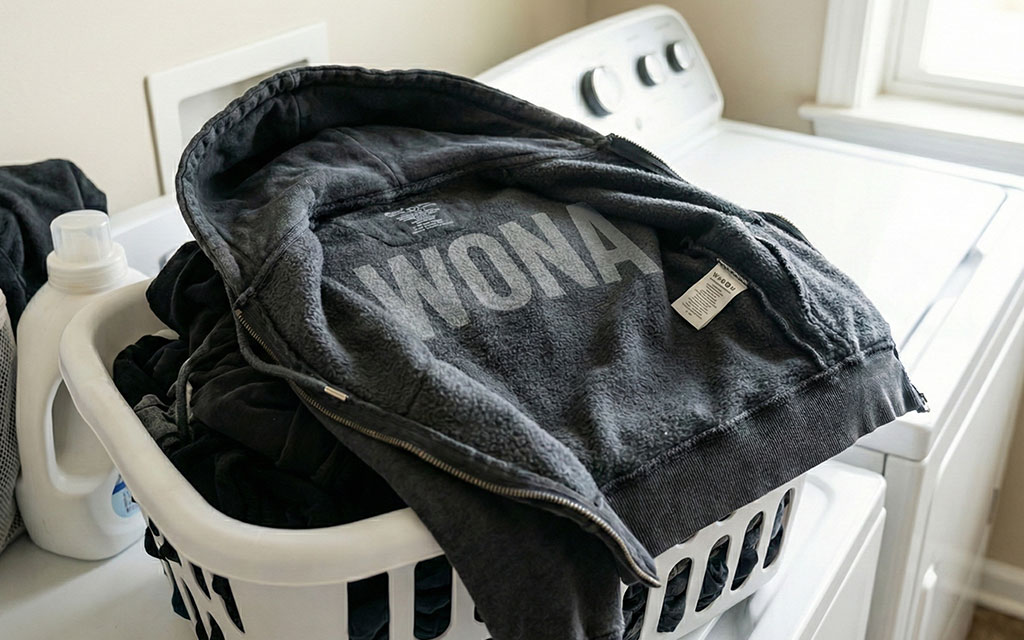
DTF vulnerabilities
DTF transfers use PET film, specialized water-based ink, and hot-melt powder that bond during heat pressing. Issues like uneven powder coverage, poor film quality, or wrong press settings cause cracking immediately or after first washes.
A scratch test on cured film reveals correct cure: tacky means undercured, excessively hard means overcured. Print shops should test transfers on cotton swatches before pressing final garments to isolate transfer problems from fabric issues.
Plastisol and screen printing behavior
Screen printing with plastisol requires precise curing. Undercured ink feels soft and peels during washing because chemical crosslinking hasn’t completed. Overcured ink hardens excessively and cracks under stretch.
Calibrated conveyor dryers and consistent flash cure stations maintain proper cure windows. Regular test strips monitor cure quality in real time, allowing adjustments before problems appear.
Heat transfer vinyl and iron-on faults
Heat transfer and vinyl often fail at edges because edge areas receive less contact pressure and heat than platen centers. Low pressure, insufficient time, or poor adhesive quality contribute to edge lifting that spreads inward.
Re-pressing at proper settings with protective cover sheets sometimes restores bonds, but persistent lifting points to adhesive compatibility problems requiring different vinyl brands or adjusted garment preparation.
Sublimation and polyester-specific traits
Sublimation dyes penetrate polyester fibers rather than sitting on surfaces, making cracking rare. Problems typically involve dye migration, poor color fastness, or fabric damage from excessive heat.
Maintaining correct polyester content (ideally 100% or at least 65%) and controlling press temperature within recommended ranges prevents these issues while ensuring vibrant, durable prints.
Quick comparison table
Print method | Common failure mode | Quick diagnostic | Prevention strategy |
DTF transfers | Film cracking, adhesive gaps | Scratch test; cotton sample transfer | Even powder, proper curing, quality films |
Screen printing / Plastisol | Overcured brittleness or undercured tackiness | Cure test strips; temperature checks | Calibrated dryer, consistent flash cure |
Heat transfer vinyl | Edge lifting, adhesive failure | Re-press test; pressure inspection | Adequate pressure, proper temperature |
Sublimation | Dye migration, color fade | Polyester content check; temperature audit | High polyester fabrics, controlled temperature |
Signs to inspect: how to identify early cracking, peeling, or flaking
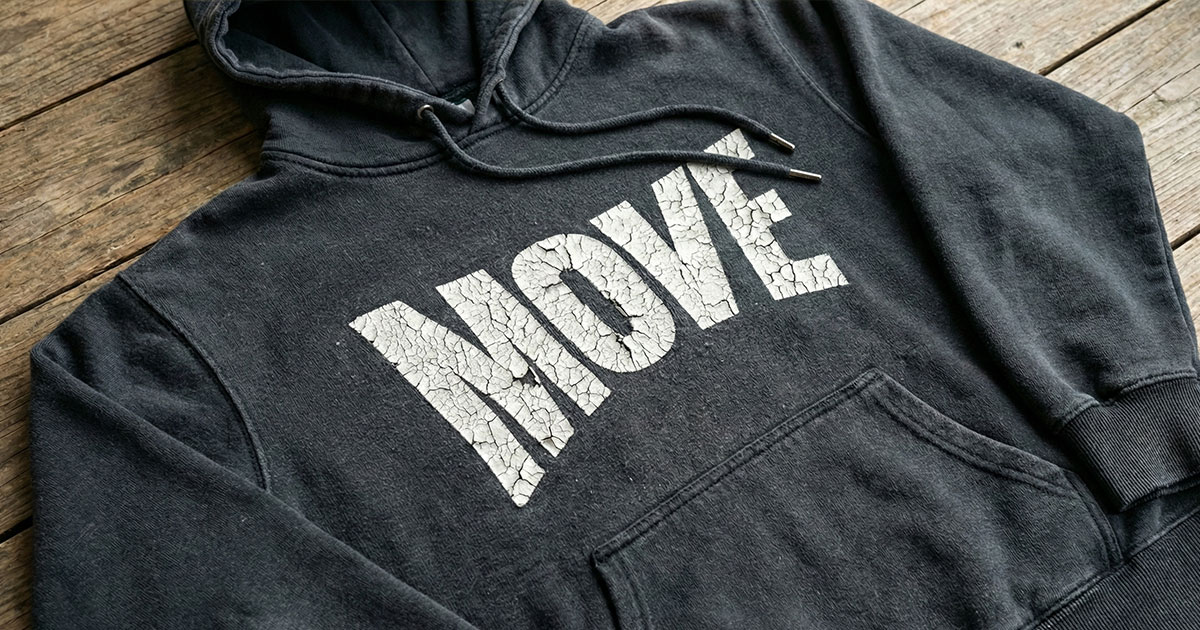
Spotting trouble early saves designs. Inspect prints under good lighting to catch hairline cracks, chips, or areas lifting from fabric. Small flakes at stress points indicate poor adhesion, contamination, or incomplete cure.
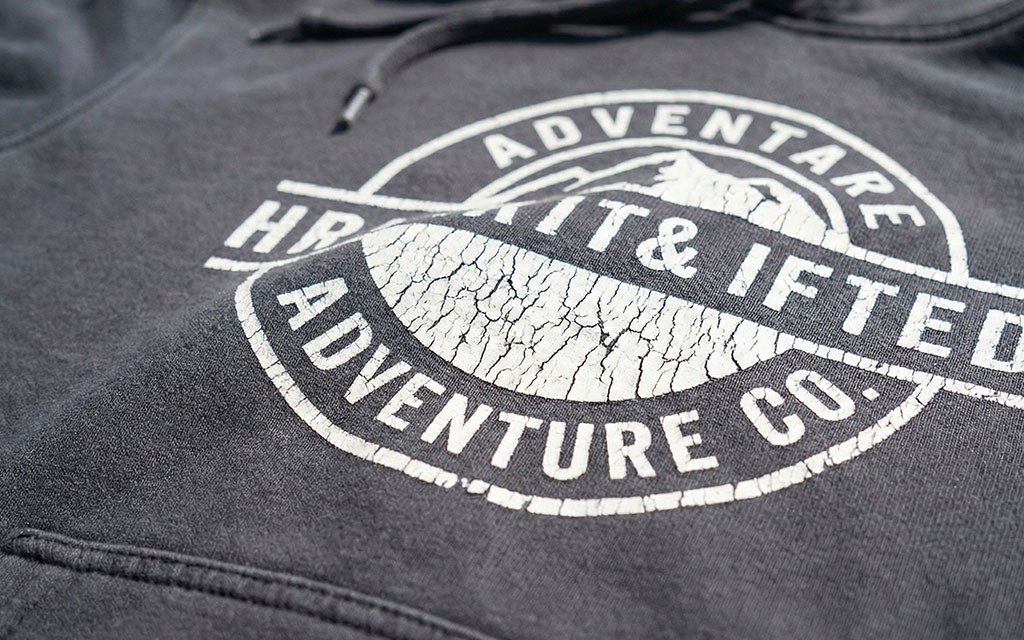
Check whether damage appears in spots or spreads across entire prints. Local peeling might indicate powder issues or transfer errors, while widespread cracking suggests curing temperature, ink formulation, or compatibility problems.
Feel print surfaces to assess condition. Smooth, flexible surfaces that move naturally with fabric indicate proper cure and good adhesion. Brittle, rigid, or tacky surfaces signal problems during curing or transfer application.
For DTF prints, test cured film texture before pressing as quality control. Sticky surfaces need more cure time or higher temperature. Excessively hard surfaces that shatter when flexed need lower heat or reduced time.
Test washes identify adhesion problems before customer orders. Wash one sample in cold water with air drying, another in hot water with tumble drying. If only harsh washing causes cracks, update care instructions and review curing steps.
Inspection check | What to look for | Likely cause | Immediate action |
Visual inspection | Hairline cracks, edge lifting, flakes | Overcure, undercure, powder clumps | Document with photos, isolate items, test corrections |
Tactile test | Brittle surface or tacky feel | Brittle = excess heat; tacky = incomplete cure | Adjust oven settings, retest cured film |
Test washes | Cracking after hot wash or tumble dry | Poor adhesion or low ink elasticity | Advise cooler washes, revise curing process |
Stretch tests | Cracks from light or repeated stretch | Ink brittleness or weak adhesion | Check formulations, improve bonding |
Delamination check | Layer separation from fabric | Transfer failure, wrong powder application | Reject batch, re-evaluate parameters |
Troubleshoot and fix a cracked print on a hoodie
When you notice a crack, examine damage closely and take photos from multiple angles for records or warranty claims. Stop using hot washes and high dryer heat immediately to prevent spreading.
Look at edges for delamination and check if cracks follow stress lines like shoulders or elbows. This helps decide if at-home fixes work or if professional help is needed. Keep notes on fabric type and original printing method.
Immediate steps
Take photos from different angles under various lighting. Turn garments inside-out and place parchment paper under prints to protect opposite fabric sides. Avoid heat, water, or harsh cleaners that could further compromise weakened adhesives.
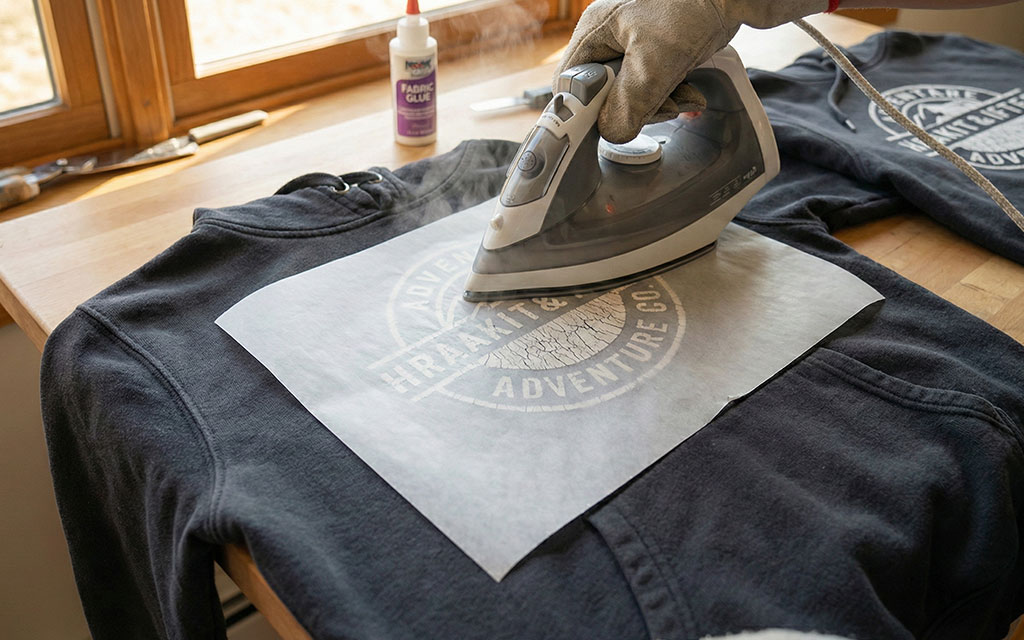
At-home fixes
The iron method fixes small flakes or minor lifting. Place parchment paper under and over damaged areas, set irons to highest dry heat, and apply firm pressure for 10–15 seconds in circular motions. Test on hidden areas first to prevent damage.
For stubborn spots where prints completely separated, acetone can sometimes soften and re-bond adhesives. Use cotton balls dampened with acetone, dab gently, and let sit 2–5 minutes. Cover with parchment and iron for 10–15 seconds.
Risks and limits
Acetone harms polyester and spandex by dissolving synthetic materials and can strip dyes or damage adhesive chemistry. Always use gloves, work in ventilated areas, and test hidden spots before applying anywhere visible. Avoid repeated applications that degrade fabric structure.
The iron method carries risks with too much heat or long press times. Scorching darkens fabric, melts synthetics, or creates shine marks worse than original cracks. Start with lower heat and shorter times, increasing gradually if needed.
When the print can’t be restored
Large cracks spanning entire designs or complete bond failures mean restoration isn’t possible through home methods. Options include professional print removal with full reprint, cover-up designs, appliqués, embroidery, or replacing garments entirely.
DTF prints with severely broken bonds usually require full reprints because removing old film without damaging fabric is difficult. Local print shops can assess whether removal and reprint is feasible or if fabric is compromised.
Safety notes
Always prioritize safety with heat tools or chemical solvents. Use parchment paper as protective barriers to prevent melting, sticking, and scorching. Follow manufacturer safety guidelines for acetone, dispose of materials properly, wear gloves and eye protection, work in ventilated spaces, and limit solvent use to small spots.
Preventive workflow for printers: curing, press calibration, powder application, and quality supplies
Maintaining disciplined preventive workflows produces durable prints that resist cracking and minimize returns. Consistent routines covering curing verification, heat press calibration, and adhesive powder technique separate professional operations from amateur setups.
Correct curing methods and verifying oven/curing temperatures
Always follow manufacturer cure charts because specifications optimize both adhesion and flexibility. DTF curing typically ranges from 110–120°C for several minutes, but brands vary. Use calibrated digital probe thermometers or infrared thermometers to verify actual oven temperature rather than trusting controller displays.
Even airflow prevents hot spots in conveyor ovens that cause uneven curing. Conduct scratch or bend tests on cured films before transferring as quality checkpoints. Tacky surfaces need more time or higher temperature, while brittle surfaces need reduced heat or time.
Heat press calibration tips: use of temperature strips and probe thermometers
Calibrate presses monthly using commercial temperature strips placed on platen surfaces and under test sheets to verify actual contact temperature. Temperature strips reveal gradients and hot spots controllers hide.
When using Teflon or parchment paper, increase setpoint temperature by 5–10°C or adjust dwell time. Aim for consistent medium pressure around 40–60 psi for DTF jobs. Document optimal press settings for different garment types and post reference charts at pressing stations.
Adhesive powder technique and storage to prevent clumps and uneven bonding
Apply adhesive powder while ink is wet for even distribution, then tap off excess to avoid stiff areas. Store powder in airtight containers in dry areas because humidity causes clumping that leads to uneven application.
For production, use automatic powder shakers for consistent coverage. For small runs, use clean trays with visual inspection for thin or thick areas. Too little powder causes peeling, too much creates stiff prints that crack.
Choosing high-quality films, inks, and transfer films to maximize print life
Use proven PET films and flexible ink systems designed for textile stretch. Avoid expired or discount inks that lose elasticity and bonding power. Purchase from suppliers providing technical data sheets and hands-on support.
Brands like STS Inks and Kodak DTF films represent tested options with established track records. Match ink chemistry and film specifications to garment types, choosing stretch-compatible systems for spandex blends and pretesting coated fabrics before full runs.
Care instructions for customers to extend print life and avoid cracking
Proper garment care keeps prints looking great. Tell customers to wash shirts inside-out in cold water to minimize friction and heat exposure that degrades inks and adhesives. This protects print surfaces and prevents hot water from softening adhesives or making inks brittle.
Air drying is always preferable because dryer heat accelerates aging and causes adhesives to harden while making inks lose flexibility. If machine drying is unavoidable, set dryers to low heat and remove garments promptly while slightly damp.
Never iron directly on printed areas because concentrated heat and pressure melt adhesives, flatten texture, or cause glossy damage marks. If ironing is necessary, turn garments inside-out or place parchment paper over designs and press briefly at low to medium heat without steam.

Warn customers to keep printed garments away from prolonged sunlight and hot surfaces like car interiors, as these environments reach temperatures high enough to soften adhesives and cause cracking or fading. Recommend mild detergents and avoiding harsh cleaners, bleach, or fabric softeners that break down inks and adhesive chemistry.
For tough stains, test fabric-safe spot treatments on hidden seams before applying to print surfaces, or recommend professional dry cleaning for valuable items. Always provide clear care instructions with every order on hang tags or in shipping confirmations because customers who understand proper care become repeat buyers.
Hoodie print cracking doesn’t mean the end of your favorite custom apparel. Understanding what causes cracking, recognizing early signs, and knowing when to apply fixes empowers both print shops and consumers to address problems effectively. For printers, maintaining proper curing protocols, calibrating equipment regularly, and using quality materials prevents most issues before they start, while customers who follow care tips keep custom shirts and hoodies looking fresh through years of wear and washing.